Friday, 29 June 2012

Another reason to smile

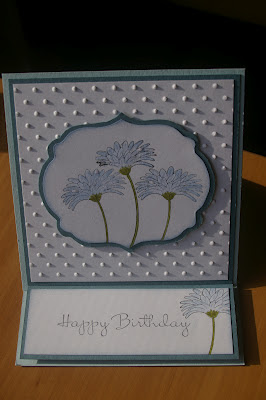
This card is one of the cards we will be making in a forthcoming class.  The Reason to Smile promotion ends at the end of the month, so if you are interested in this set you had better hurry.   It can be yours free with a purchase of over $125-00 or you can buy it individually.  Let me know if you are interested.  

This card is called an easel card because of the way it can lie flat for postage, but then it will stand up like an easel.  I had originally decided not to purchase the new Labels Collection Framelits, but they really are worth it.  It's such a lovely shape and I love the way you can frame it with a larger shape.  So easy.  


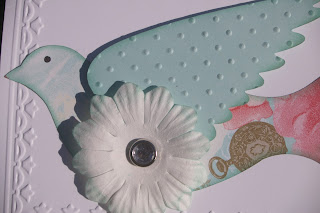
Added these two photos so you can see why it's called an Easel Card - it props itself behind the front panel. 


Thursday, 28 June 2012

Comments please

Because I love to read your comments, if you wish to leave your name when commenting, go to the dropdown menu, choose Name/URL and type your name where it says "name".  There is no need to have a URL (and I don't even know what a URL is).  If you have ever wondered how to get your name there, wonder no more.  It's that simple. 

Wednesday, 27 June 2012

Manhattan copy

Hey, scroll down and look at the number of visitors to this site.  It's over 1000!!  I guess about 100 of those would have been me in the beginning when I kept on checking up on whether I had posted properly, but now I seem to know what I'm doing, it must mean other people are looking too.  So, if you are one of the regular people who check out what I have been up to - Thank you.  

This card is a direct copy of a very popular card a few months back when the Manhattan Flower embossing folder first came out.  Sometimes it takes me a while to catch on to the current trend, but I get there in the end.  


Fifth Avenue Floral is the stamp set used here and this combines well with the embossing folder.  Sadly it looks like Fifth Avenue will be retiring at the end of August and will not make it into our new catalogue if the American catalogue is anything to go by.  The cardstock and ink are Soft Suede, which just goes to prove that this colour is not just for males.  

Monday, 25 June 2012

How long does it take?

Sometimes I am asked how long it takes to make a card.  It depends on whether I have an idea of what stamps I want to use and whether I have an idea of how I want it to turn out.  

I had the opportunity one day to stamp out some of the images from Kimino Kids.  This set is now retired, but if any of you remember it, you will recall there were two little girls, a fan, umbrella and a string of chinese lanterns.  My original thought was to colour in the lanterns in bright colours, cut them out and then string them across a card with the little girls underneath glued onto a circle for effect.  So, after I coloured in the lanterns, they were too light, so I went over them with aqua pencils.  The little girls were then coloured in too, but they looked too bright, so I thought I could soften them with tissue paper, but instead of crinkling up the paper first I just stuck it down on the little girls, realised my mistake, but decided I liked the soft subtle effect so cut the little girls out.  After playing with the lanterns for a while I didn't like them after all, so after about 4 hours this is the layout I came up with.  And then when I decided it wasn't too bad after all, I did that "just one more thing" and ruined it.  


I put clear KindyGlitz on the exclamation mark in the greeting, but it made the ink bleed!  Sometimes you should just leave well enough alone.  So long story short, some cards just come together, other like this one take time.  Now I wish I kept some of those lanterns for the left hand corner

Friday, 22 June 2012

You have to resist

This is a great technique to try out.  It's called the Emboss Resist technique and it's easy to do and very effective.  The main panel here has been stamped with the leaves from French Foliage in VersaMark and then embossed with clear embossing powder.  The En Francais background stamp has then been stamped with black StazOn over the top, and then when dry I used a sponge dauber with More Mustard to shade around the embossed leaves, darker around the image.  Just added another leaf as an embellishment, and it's done.  Very easy.


Family stuff - My poor daughter had her four wisdom teeth removed on Monday in hospital.  She hasn't been eating for the last two days, and is only now just starting to swallow (can't chew) food.  Her face is swollen and slightly bruised, but she is gradually getting better. 

The males in this house are hoping for good weather today with no rain so they can head out with their go-karts tonight.  Too cold out there for me - I'll support them from home. 


Wednesday, 20 June 2012

Cling wrap background

As work has interfered with my crafting once again it's back to old cards.  

I love the background in this card and it is so easy to do.  All you do is grab a bit of cling wrap/glad wrap, scrunch it up and use it as your stamp.  So simple, but very effective.  It gives it a very marbled effect.  The butterfly is from Butterfly Prints.


This technique is great when you need something in the background but don't have anything that suits.  I made a teenage boy's card using Cajun craze  (a browny red colour) and glad wrapped it in Night of Navy.  Sounds disgusting, but it looked really "grungy" and suited the card really well.  Stupid me forgot to take a photo of it, but it was really effective. 

Monday, 18 June 2012

Something old and something ... old

As Saturday was such a miserable day I had the opportunity to spend most of it my room doing a bit of tidying up, messing up and playing with my stuff.  I have half made lots of cards getting ready for a new class in July and have so many ideas running through my head for new things to try, but unfortunately I don't have any completed projects.  So have gone back through some cards made last year to show you.  

This card was made around the time of the 2011 catalogue cause it uses each of the current In colours released last year; Island Indigo, Wisteria Wonder, Calypso Coral, Lucky Limeade and Pool Party.  We made this card at a class held around that time and I wanted to show the new colours.  The stamp set is Sweets for the Sweet and the pin wheels were popped up and one of the Designer Brad used in the middle.   


This card was made around the time of the promotion for the Ice Cream Parlor ribbon and buttonsThe flowers are from the For Everything set. 


Back soon, hopefully with something new. 


Sunday, 17 June 2012

Flowers anyone?

I found this while looking on the internet and thought I would re-post it in case anyone was interested.  I love the Rick-Rack rose but looks a bit difficult for me.  I think the loopy one would be easier for me to make.  If you make one I would love to see it.  My email address is now on here, so send me a picture.  If you click on the blue title it should take you to the tutorial on how to make (hopefully). 

lisapace.comRibbon Flower Tutorial: Simple method involving weaving thread through the ribbon and gathering it into a flower. Embellish with pretty buttons.
lisapace.com

cuteasafox.com No-Sew Rosette: Shows how to make a pretty flower using wired edge ribbon and a dab of hot glue.
cuteasafox.com
vanessachristenson.com
Pin: Another tutorial showing how to make a pretty flower using wire edged ribbon, folding and sewing. Attach a piece of felt on the back to hold a pin if you like.

Pleated: Made with satin or grosgrain pleated ribbon, a bit of glue, a piece of chipboard and a button.
mayaroad.typepad.com
hopestudios.blogspot.com
Loop: Easy to make, uses thin ribbon arranged in loops and held in place with glue or a pretty button.

EasyPretties: Finish with pretty gem centers, button centers or leave as-is.
candicecarpenter.typepad.com
burdastyle.com
burdastyle.com
Rose Bouquet: Made with satin ribbon (or fabric if you wish), stems are made with wire and floral tape.

Rolled & Folded Roses: Made by rolling and folding then stitching in place every few sections to secure in place.
weddingbee.com
weddingbee.com
onelittleword.typepad.com
Folded: The ribbon is first attached to a felt circle then folded and stitched in place around it. Embellish with a button in the middle.

Rolled: Ribbon is first attached to a circle punch (with hot glue) then twisted and rolled around the circle (while being glued in place).
flourishes.org
flourishes.org
nikkiinstitches.wordpress.com
Ruched: Ribbon is first gathered in a zig-zag pattern then rolled together to shape flower.

Double Layer Organza Petals: Made with wire edge organza ribbon, fold and pleat into petals (held in place by a few stitches in the center). Embellish with pretty beads in the center.
weddingbee.com
weddingbee.com
scrap-a-little.com
scrap-a-little.com
Two-Toned Ribbon Roses: Made with two strands of ribbon and folded and rolled into a flower, use as the center of pretty gift bows if you like (scroll down page to see example)

Folded Roses: Folded at right angles to build a stack of folded squares and then pulled to shape.
obstinatepursuit.blogspot.com
bayoubags.com
bayoubags.com
Simple Flower Tutorial: Uses little flower stamens (from the cake decorating aisle of your local craft store), or substitute a narrow ribbon in their place

Rick-Rack Rosettes: Made with two strips of medium rick-rack sewn together then simply rolled and dabbed with hot glue.
thecraftingchicks.com
missiekrissie.blogspot.com
No-Sew Trim Flowers: Make rolled flowers from lace, eyelet or ribbon trim (held in place with hot glue).

Five Petals with Rounded Ends: Here’s an interesting technique that rounds the ribbon edge with a washer and wood burning tool.
ribbonflowers.blogspot.com
alliesinstitches.blogspot.com
Canterbury Bells: (to applique on projects) Made with wired ribbon.

Friday, 15 June 2012

Sunshine at last

Finally we had a bit of full sunshine today, hopefully that means the rain and cold will be absent for a while.

Another borrowed stamp set here.  This card uses the leaves from Growing Green and flowers from Fabulous Florets.  


Don't think this one rates as one of my favourites, but I have always liked the fern from this set.  I wish it were a solid image though instead of outlined, would make it easier to use. 

Wednesday, 13 June 2012

More Big Shot accessories

This card and the last one prove that you don't really have to stamp to make nice cards.  I have used the Elegant Bird Bigz Die and Framed Tulip and Perfect Polka embossing folders on this card.  The DSP paper is one from Attic Boutique with Pool Party wing.  A non-SU paper flower and brad have been added for that touch of bling. 


Monday, 11 June 2012

Beautiful Wings

Have I mentioned how much I love my Big Shot cutting machine.  It was a big expense, but well worth it.  I am slowly buying embossing folders and dies to use in it, and love the fact that you are not limited to just one particular company's products.  

My card has been made using the Perfect Polka Dots folder on the base and then one of the butterflies from the Beautiful Wings Embosslits Dies.  Beautiful Wings comes with five different size butterflies and all of them have some form of texturing on them.  The butterfly chosen for this card is the 2nd largest one with embossed dots.  Have used the old faithful squares and changed it slightly by using circles as well.  And also a little bit of bling to make it sparkle.  


Wouldn't it be great to be able to fly away somewhere warm at the moment.  I am over this cold weather, and it's only just started!  One of my family needs to win a large amount of money and shout us all a trip to ... Tahiti sounds nice. 

Friday, 8 June 2012

A little bit of Happiness

This is another borrowed stamp set - Happiness Shared.  I've often thought of getting this one too, so it was good to be able to use it.  One of the advantages of getting together with friends who have almost everything. 


The image has been stamped out, watercoloured and cut out (called fussy cutting for some reason), then mounted on 2 separate squares and then a border die in Rich Razzleberry.  The first layer has been sponged around the edges and then popped up.  The base card is Crumb Cake.  I haven't put a sentiment on yet, but could be a birthday, thank you or sympathy card, or just a gift tag. 


Wednesday, 6 June 2012

Fox and Friends

I have thought about buying this stamp set many times but we don't have any little kids in our family anymore to warrant it.  So it was great to see it amongst the many sets bought along on the weekend to play with.  When I stamped out the images I didn't really have any idea what I would do with them, but fortunately I left enough room around each one to punch out using my trusty square punch.  The square was then placed on a larger square of the same colour as the image (I love how everything matches with SU) and then arranged in a block with paper piercing around the edges.  Simple but effective.  


I think Mr Fox is my favourite and he looks so elegant in Cherry Cobbler. 

I also had the chance to play with the Postage Stamp punch on Saturday.  I had seen this card here by a UK demonstrator and thought it looked interesting and wondered how she made it. She actually tells you on her blog, but as I only had a picture to go by I had to reinvent the wheel.  This is my version.


I laid the four newsprint squares on a piece of Calypso Coral, stuck diagonally down half of the shape, inserted the other square into the middle at an angle, glued the lot down and then cut around the block leaving a border.  I think an easier way might be to cut out a 2 inch square (presuming you are using a 1 inch punch), cut a slit down the four sides almost to the middle but not through it and then insert four punched out shapes and glue down.  Haven't tried it, but am sure it would be easier than 8 small pieces.  The border is the Framed Tulips Embossing Folder which unfortunately is made for American card makers so it had to be adjusted slightly to our A5 size, hence the cut line down the right side.  (Wonder if you noticed it without me pointing it out).

Don't forget if you make a different version of one of my cards I would love to see it.  

I also re-did the labels on the left side so if you are interested in one particular stamp set it will be easier to find.  


Monday, 4 June 2012

Another Reason to Smile

I had a very crafty weekend spending Saturday with 3 other stampers and Sunday with my sister, both days spent making cards.  As the weather was cold and drizzly it was perfect weather for being inside creating.  

On Saturday between the four of us we had so many stamps and accessories to choose from it was quite overwhelming at first - I just wanted to use it all!  Contrary to popular opinion I don't own that much stuff.  Well, maybe I have a fair bit but some people have heaps more.  Not that I'm jealous.  

Then on Sunday it was just two of us, so all those bits I stamped, punched and Big Shotted out the day before I tried to make into something.  

This card is from one of my weekend companions who had a play with the Reason to Smile stamp set.  I have been trying to make something with this set over the last couple of days that I actually like without any success, but this one looks good.  Even though this is a two step stamp, it doesn't have to be used that way.  These have just been stamped out and the top three sponged and popped up.  


I am sure my guest artist would love some feedback, so please leave her a message.


Friday, 1 June 2012

Simply Soft altogether

As promised, I was working on a card using the new Reason to Smile set, but after a few attempts it still wasn't working, so decided to copy someone else's idea.  As this is a new set there weren't many ideas out there to copy, but during my time I found this card.  Simply Soft is one of my favourites and I have used it many times but strangely I have never thought of putting all the flowers together like this.  I also tried to copy the same colours Loll used, but substituted the softer Wisteria Wonder instead of Elegant Eggplant.  


I'm happy with the white triptych panel, but not entirely convinced that the backing is right.  So this is the remake. 


So, spots instead of stripes, white instead of Wisteria?  I actually think I prefer Loll's version now even though at first I thought it was a bit underdone.