Monday, 23 December 2013

Happy Christmas

Well I knew I had not been on here for a while, but I was a little surprised to realise it has been almost 6 weeks.  So, if there is anyone still out there checking to see if I write any more on here, hello and thanks for popping back.

We had our last class for the year earlier in the month and the ladies all got to  make a card using the thinlits circle or label card dies.  These are great little sets that cut the card out to make a flip card and also have loads of different shapes that you can use to decorate the card like scalloped circles, arrows, and a few greetings.  

I decorated the labels card with some of the dies that are included, and then on the circle card used the scalloped circle and some patterned paper to pretty it up.  Both very easy cards to make and decorate.


We also had a go at making a starburst card.  This is one of the latest trends in the stamping world apparently.  It involves making a template up first with and then uses it as a mask. 


I wish I had taken photoes of the ones that were made because they were definitely better than my attempt.  I guess my two problems were that I chose the wrong colour to start with and then didn't stamp enough to define the edges.   Hopefully you get the idea.  

We also had got to make a few envelopes with the envelope maker.  It's so nice to be able to make any size envelope you need so easily.  

We also had lunch together with everyone providing something and there were lots of delicious foods to chose from.  And one of the ladies even provided us with an elegant chocolate table decoration.  Very pretty, and not bad to eat either.


These are photos of the little gift cards that I gave everyone when they left.  I love making owls and so he got dressed up as Santa.  Inside were some Rhinestone and Pearl Jewels for them to use on their own projects.


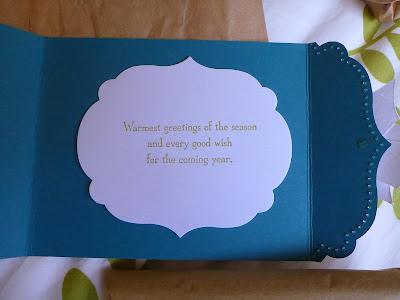
And finally, this is our Christmas card for the year.  I really wish Lucky Limeade didn't get retired off - it's one of my favourite colours and perfect for me for Christmas. If you haven't received your card yet blame it on the postman. 


Thank you again for visiting my blog throughout the year.  I hope to have more things to share with you next year, including all the great cards we have received this year.  I have some very clever and talented friends. 

And if you would like to leave a comment anytime, please do.  It's nice to know someone out there is reading this.

Finally, Happy Christmas to you and your family.  Enjoy the break and stay safe. 

Friday, 15 November 2013

My birthday cards

I don't have anything to share with you as I am working on my Christmas Cards, and I obviously can't put them up here for all to see yet, so I thought you might like to see some of the cards I received recently for my birthday. I was away visiting my Dad on the actual day but arrived home to some wonderful creations.   

Don't you love that oval die cut?

Have always wanted to see how this looked in real life - beautiful!

So much work went into this one, and I love that die cut flourish

So pretty with those lightly coloured  flowers from Bordering on Romance and the scalloped edges

One of my favourite stamp sets - Bliss - in soft pastel colours

And one of my favourite colours - Elegant Eggplant combined with Fifth Avenue Floral

This card was made with the Sweet Threads Simply Sent kit and looks great
Apologies if I have forgotten anyone's card.  I am currently in the process of re-organising my craft room and things are a little bit of a mess.  I may not be back blogging for a while, but will return when there is something productive to share.  
 

Wednesday, 13 November 2013

Another Sampler

As I had so much fun making the sampler for my sister I decided that I would make another.  This one is the final version of one for my recently born great niece.  

I had bought a sheet of 12 x 12 paper with a Holly Hobby design that I was planning to use, but after spending a lot of time cutting it all up I decided I didn't really like the look of it.  So I went back to my stamps and decided to stick with a limited colour scheme.  And I got to use a lot of my before Stampin' Up stamp sets that hadn't been used for a while.  

The big "mistake" that I made was using 4 colours when there are lines of 5 which made the order of things a little difficult.  You can see that the main colour turned out to be pink, but in the end I didn't mind that, although next time I will make sure I have 5 colours to make things easier.  

The hardest part about these frames is trying to get everything even when sticking them down.  

This is the layout without the frame -


And all framed up -


Stay tuned - I have one more to make, this time for myself. 

Monday, 11 November 2013

Another birthday

Guess what I forgot to do?  I went away to visit my Dad and had scheduled a few posts for while I was away, but then when I came back I completely forgot all about posting.  I guess I just assumed there were posts ready to go - oops.  

I seem to have lots of birthdays around October/November, and this one was for my 17 year old niece.  It gets a little hard thinking of a suitable gift so we thought a gift card might be the way to go.  I wanted to make a pocket style card for the gift card and this was the end result.  

I used the top note die for the lovely flap shape, sponged with Coastal Cabana and stamped with my favourite script from French Foliage.  Two buttons with a bit of string kept it all together and even though they weren't exactly the same colour I don't think it stands out too much.  Perhaps I should have used a softer colour for the flower stamp, but I didn't have enough time to re-do it.  


Monday, 4 November 2013

Male Lovely as a Tree birthday

Another borrowed set was used here - Lovely as a Tree.  This is a great stamp set as it can be used for many different occasions including Christmas or birthdays. 

This card opens in the centre and the main piece has some paper piercing around it.  The front panels were stamped with the leaf and then masked while I sponged around them.


Friday, 1 November 2013

Sampler

My sisters are very supportive of me and my stamping habit so for big sister's birthday I wanted to make something 3D using my stamps.  During one of my stints on Pinterest I saw something called a Sampler by Diana Gibbs and thought this might be just the thing.  

You can view Diana's version here  and Cecile Ortiz's original inspiration here.
Neither of them give much information about sizes and details, and you may just have to brush up on your French to read Cecile's blog, but sometimes all you need is the idea.  

I used my trusty square dies and a friend's scalloped square dies and then just went through all my stamp sets for appropriate images for each square.  A few are direct copies of Diana and Cecile, lots of stamps are borrowed, a few stamps are mine and most are from Stampin' Up sets. 


 All of the squares are sponged with Crumb Cake on Vanilla cardstock, some with backgrounds and all have parts of the square with something popped up on them.  In the end I had to call in some technical assistance to have the typewriter and sewing machine scanned from the catalogue cause I couldn't find anyone with these sets.  

Once the panels were all made up I stuck them down on a sheet of DSP that had grid lines on it to make it easier to line up.  Then I had the family searching the shops for frames.  We found a few different sorts but I came back to this one.  

Then there was the trouble to post it off.  I went to a local post office and asked for advice on how to send it to Queensland, but the helpful (NOT) assistant informed me that as it was glass she didn't know.  So I asked again the best way to post it and was pointed towards the boxes and padded bags.  Yes I did see them but what would be best to use, that was my question.  In the end I couldn't find a box big enough with packing so it came back home and hubbie found me a courier to deliver it.  Arrived next day with no damage. And my sister loves it.  Phew!
I had so much fun making this that I am working on a couple more for family members, and one for myself too.  I will make sure that I hand deliver these ones.


Wednesday, 30 October 2013

Cardstock Patchwork

My sister recently celebrated her birthday and as she is the Queen of patchwork I thought I should try to make her a patchwork card.  Now I don't sew that well and certainly don't do patchwork, so this is my version of a patchwork card. 

I used my trusty Big Shot with square dies to create the boxes - so much easier than relying on cutting straight lines all the time.  If you are thinking about trying a card like this, it's much easier to glue your squares in place on a piece of scrap paper first rather than sticking straight onto the cardstock.  That way if you do make a mistake it's easier to rip it off and start again. 


And the inside ... I would be lost without the French text stamp from French Foliage.  


Don't you love that brad.  It's a Designer Builder Brads that you can decorate using anything you want in the centre and then you pop a clear "dome" over the top to seal it.  So pretty.  


All products are from Stampin' Up except square dies.

Monday, 28 October 2013

French Style Birthday

When I look through the Stampin' Up catalogues there are so many stamp sets that I would like and this was one on my wish list.  Unfortunately I would be broke if I bought them all so it is nice to have friends who are happy to share. I was able to borrow Artistic Etchings (now retired) recently and made quite a few cards of similar design for family and friends.   
       
This time I went with vanilla and black cardstock and even pulled out the crimper instead of using ribbon.  Lots of sponging on here and a bit of bling.


Friday, 25 October 2013

Happy Birthday Poppies

My sister in law celebrated her birthday this week and this is the card I made for her.  A friend of mine lent me some of her stamps and I have always liked this set.  I chose to stamp the poppies on some Newsprint DSP in black and then coloured the stalks with a blender pen.  I don't mind a bit of cutting out so I stamped the image again on Wisteria Wonder and cut around all the poppies.  They were sponged with Wisteria on the edges and then stuck onto the Newsprint image.  I found an image of the bow shape on the internet so enlarged it slightly to the size for my card and cut it out to make my bow.  And I even decorated the inside. 


It's been a tough and stressful time this week for a lot of people living in the fire affected areas around NSW.  Greg's sisters were both in areas that could have been impacted if things became worse on Wednesday and they packed up ready to leave at short notice.  Fortunately they and their homes were not harmed thanks to the efforts of all the fire fighters.   

A lot of people this week didn't even get a chance to think about what to take - it was just make sure all the people got out.   

This prompted a discussion at home about what we would take if we had a little time to pack up.  For my family we would have to take the laptops and hard drives.  I would want to take some of my scrapbooks and then my box of cardstock and ink pads.  And I don't want to leave behind my Big Shot.  I hope I never have to worry about this happening. 


Wednesday, 23 October 2013

More Christmas Cards

Sorry, but I still have a few more Christmas cards to show.  I told you I made a few extras to show.  

If you enjoy making your own Christmas cards, but are not that keen on stamping, then this card may be something you could do.  I have used some leftover Christmas papers from last year and simply created 3 strips or banners, attached a strip of cardstock with a sentiment and used one of the coloured buttons made with the Buttons and Blossoms Simply Pressed Clay Molds kit.  I am sure your friends would be happy to receive something like this. 


But with a little stamping you could create a card with a little more sparkle by using a swirl or flourish, emboss it with silver or gold in this case, attach a sentiment on an ornament shape with a bit of ribbon and another relatively easy one to do.  I stamped both layers of Cherry Cobbler at the same time and inserted a piece of white matt just to bring it out a little.  A little more involved, but still very Christmasy. 


And I have to wish my big sister a very happy big ??th birthday for Thursday.  Hopefully your family will spoil you this year and take you somewhere special for dinner. 

Monday, 21 October 2013

Christmas Door card

While getting organised for my last class I found this inspiration for a card on Pinterest from Loll Thompson.  Her card was more grey and white but I chose to use Cherry Cobbler for my door.  I had to borrow the tiny leaf punch from a friend specially to make this card.  Unfortunately I didn't have the lovely embossing folder that looks like bricks so instead I used the scoring plate to make my "house" look more like lengths of timber panelling which you cannot see with my very poor photography.  I must get someone technical to look at the settings for me - I must have changed something cause the photos lately are not great.  

To make the door it is simply a matter of cutting the shapes and sponging the edges for effect, adding a brad for a door handle and then some red brads for the wreath.  I used the Decorative Label punch to make the pots and cut bits off and added extras to make it look better.


After lots of deliberating I recently bought the Magnetic Platform from Stampin' Up.  It is a lot of money, but I have to say after going through lots of post it notes to hold framelits in place when using the Big Shot, I think it is worth it.  I love how nothing moves around and you can be confident that the image it cuts will be how you positioned it in the first place.  If you have been considering buying the platform - do it.  You too will be pleased you did. 

Friday, 18 October 2013

It's still Christmas here

This is the third card made last Saturday with Festive Flurries stamp set and Framelits.  It's not super clear in the photo, but there is a snowflake shape cut through the front of the card through which a ?? (I can't think what you would call it - a decoration, ornament, dangly thing) hangs which can be detached and the recipient can then hang it on their Christmas tree.  The lovely paper is from the Winter Frost DSP pack which comes with 48 sheets of 2 different double sided designs, all for just under $12.  All designs coordinate perfectly with Coastal Cabana (used on this card), Island Indigo, Bermuda Bay, Pool Party, Smoky Slate and Whisper White cardstock.  


And the final thing from Saturday was everyone got to make one of the larger ornaments in their favourite colour.  I have made a few of these and prefer the lighter colours, but there were some bold ones made which also looked beautiful. 
 

I still have a few more Christmas cards to share with you as I went through a couple of ideas before deciding on the previous 4 projects.  Shame I can't use any of them for my cards this year - that still has to be done.