Tuesday, 29 September 2015

A replacement for the shaker

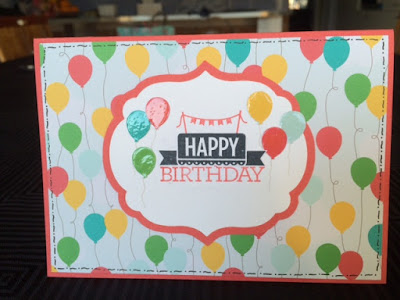
You may recall a couple of posts back I made a shaker card for my niece's birthday.  I wasn't happy with my first attempt so changed the colour of the outer layer and blackened the second layer.  Well, I still didn't like the way it looked, so I had to make another card to give her instead.  

This time I grabbed some DSP from the Cherry on Top paper pack, which then gave me the ideas which colour cardstock I could use to complement the paper design I had chosen.  I added a sentiment using a couple of die cut outs and then hand cut a few extra balloons and stuck them down.  Drew in the string lines with a black marker and then added a bit of Glossy Accents for the sparkle.

After that it still looked a little "blah", so as I still had the black marker on the desk I drew a stitching line border around the edge.  A bit better.  
 

Thursday, 24 September 2015

A couple of quick cards today made using my Hello You dies.  A Wisteria Wonder version and a Pool Party version.  Which do you prefer? 


Tuesday, 22 September 2015

M-I-L birthday

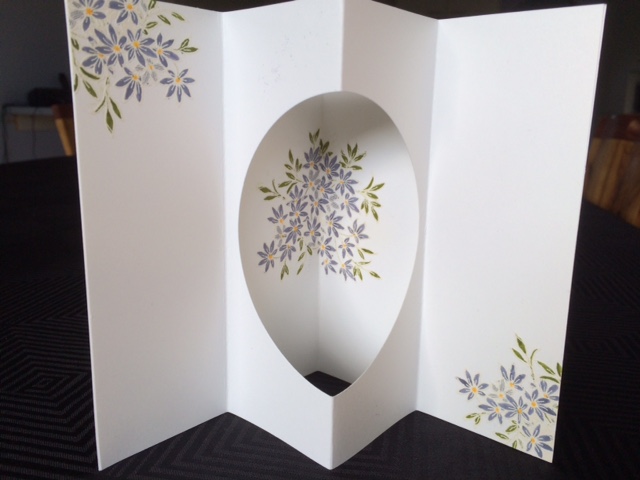
My card today was made a while ago, but I had to keep it hidden as it was for my mother-in-law's birthday in September.  A fellow demonstrator and I got together one day, and she and I each had a try at making one of these cards.   I've just spent 20 minutes on Pinterest trying to find out what the name of this sort of card is called, but I can't find any today.  

So, from the outside this is just like a normal card ...


 But when you open it up ...


.. it has an extra layer with a little window. 

Thursday, 17 September 2015

Card 4 and Father's Day

These are the last cards made at our class a couple of weeks ago.  I saved the best till last, at least this is my favourite one.  I have "needed" this stamp set for a long while, and finally I deliberated no longer.  I don't know what appeals to me most about this set - it can't be the bird because anyone who knows me, knows that I am not a fan, at all, of birds.  They are OK flying high above me, or sitting in a branch over there, but I start to freak if they get too close.  I know I am not the only one who feels this way, I have met a few people who are much worse than me.  But back to the card.  

We used Delightful Dijon as our base card which was accentuated with black and white.  Markers were used to colour the image, and it's interesting what different colours were chosen for the berries.  I know we had a few different reds and from memory, a blue/purple shade.  All looked equally beautiful.  We added a doily to the back and used the old tab punch just for something different to add  As I said, my favourite.  


And the final card is my Father's Day card to my father-in-law.  I have to confess, this one was made in a hurry the day before and my mind wasn't in a creative mood, but one of the ladies at our class gave me the idea.  My F-I-L isn't actually a tie kind of man now, but I love how the card turned out.  Couldn't get it in an envelope though as I didn't want to squash the bows.  And then we ended up leaving it behind when we met for lunch on Father's Day, and he didn't get it till a week later.  

My Dad's card was a black tuxedo card that I'm sure you've seen doing the rounds on Pinterest, but I forgot to take a photo.  I hope to go and see him shortly, so if it's still around I may be able to get a photo. 


Tuesday, 15 September 2015

Card 3

This is the third card from our class - a shaker card.  I have been wanting to share one of these with this group of ladies for a long time, but held off because I thought it would take too long, or be a little ... challenging.  Well, I was wrong.  Once everyone knew what to do and we had no problems.  And we didn't even have any sand leakage issues.  

Both front panels were cut out together using one of the oval framelits, and then the Taupe layer was then cut by hand on the edge line that the framelit makes when run through the Big Shot.  This was probably the least favourite bit.  We used Magic Mount sheets which made things a lot easier than using thick double sided tape just around the edges.  The centre of the Magic Mount was cut out using the same oval framelit, and then trimmed slightly smaller so that it didn't show through the front panel.  After stamping the picture on the front of the card, and adding acetate to the top layer, the Magic Mount was peeled away and the bottom half secured in place, sand added and checked to make sure there was enough/not too much sand, and then the top half peeled away and secured.  


In case you are looking at that smaller turtle and wondering where he came from, he is a non-Stampin' Up one a friend loaned me, but they both just seemed to go together - Mum and her baby.  

And because I enjoyed this one so much, I made another shaker birthday card for my niece using some old stamps of mine.  I wasn't entirely happy with the colours I chose, so I coloured in the yellow layer with a black marker and added another layer to the top.  No, I am still not entirely happy with it.  Stampin' Up need a new blue cardstock, not a baby blue and not a dark blue.  Maybe next year.  


Thursday, 10 September 2015

Card No. 2

The next card from Saturday was relatively easy for guests as there were no decisions to make.  It was also easy for me to design too, because I didn't have to.  This card is a direct case from a demonstrator in the US named Laura.  This is the link to her card - Laura's Works of Heart, so you can compare our cards. 

A little bit of work in this card with two different embossing folders: Perfect Polka dots and Delicate Designs, a Big Shot die: Hello You thinlits and stamping using the Crazy About You set.  Laura added a button, we added a pearl, but both cards look beautiful.


Tuesday, 8 September 2015

Cards from Saturday

As promised, a couple of the card we made on Saturday.  

The first card was a Christmas card using the Berry Merry bundle from our new holiday catalogue.  The bundle combines the stamp set with an embossing folder saving 15% of the normal price.  Guest on the card were able to choose their own design; either using the stamp set without embossing folder, with embossing folder or they could sponge the embossed section with daubers.  Most chose one of the first two options. 


Stamped and embossed -


Sponged with daubers -


Stamped -


I think they enjoyed whichever one they chose.  My preference is stamped and embossed.  Which do you prefer? 


Thursday, 3 September 2015

Thank you tags

As I am in the middle of preparing stuff for a card class this Saturday, which I obviously can't put on here yet, I thought I would show you a couple of recent Thank you tags for customer orders.  


And this is one I received from a friend.  


Pop back next week to see the cards we will be making on Saturday.